Customization
Customization Guide for Tuning File Platform
This document provides step-by-step instructions for customizing the automotive tuning file platform after installation. Follow these guidelines to modify the code and layout according to your requirements for optimal tuning file workflow management.
1. Customization Overview
After extracting the files in Plesk, you can customize the code and layout of your tuning file sharing platform based on your needs. The platform is built using Laravel, which makes it easy to modify specific sections like the header, footer, homepage, and form fields to enhance your tuning file collaboration platform.
2. Key Customization Points
2.1. Portal Logo Upload
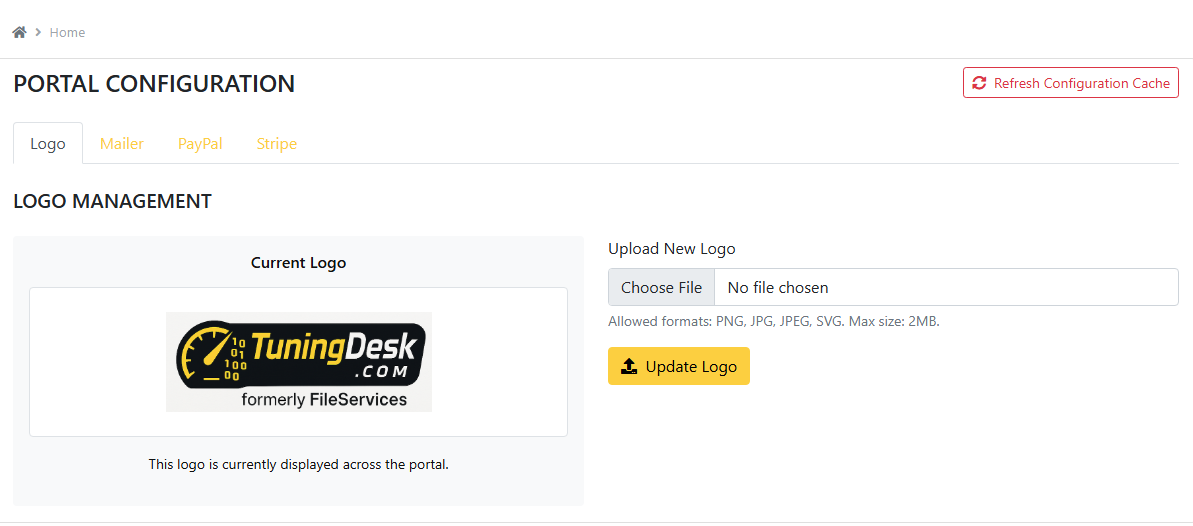
Admin can update or upload the portal logo directly from the Admin Panel. Only Admin users have access to this setting.
Configuration Steps:
- Visit: Admin Portal Configuration
- Open the Logo tab.
- Select the desired logo image.
- Save the configuration.
The updated logo will be reflected across the entire portal, including the Admin dashboard, User dashboard, and public-facing sections.

2.2. Header Customization
To modify the header, update the header.blade.php file:
File Location:
/resources/views/layouts/header.blade.phpExample Code:
<header>
    <div class="container">
        <nav>
            <a href="{{ url('/') }}">Home</a>
            <a href="{{ url('/about') }}">About</a>
            <a href="{{ url('/contact') }}">Contact</a>
        </nav>
    </div>
</header>
To Customize:
- Change the text or add more links.
- Add CSS classes to modify the design.
2.3. Footer Customization
To modify the footer, update the footer.blade.php file:
File Location:
/resources/views/layouts/footer.blade.phpExample Code:
<footer>
<div class="container">
<p>© {{ date('Y') }} Your Company. All rights reserved.</p>
</div>
</footer>To Customize:
- Change the copyright text.
- Add social media links or other footer details.
2.4. Homepage Customization
To modify the homepage, update the welcome.blade.php file:
File Location:
/resources/views/welcome.blade.phpExample Code:
@extends('layouts.app')

@section('content')
<div class="container">
    <h1>Welcome to Our Platform</h1>
    <p>This is the default homepage. Customize it as needed.</p>
</div>
@endsection
To Customize:
- Update the heading and paragraph text.
- Add additional sections or design elements.
2.5. External CSS (Global Styling)
To modify the global styling, update the app.css file:
File Location:
/public/css/app.cssExample Code:
body {
    font-family: Arial, sans-serif;
    background-color: #f9f9f9;
}

h1 {
    color: #333;
}
To Customize:
- Change font styles and colors.
- Add additional CSS rules for custom layouts.
2.6. Form Fields Customization
To modify the registration and login forms, update the following files:
Registration Form:
File Location:
/resources/views/auth/register.blade.phpExample Code:
<form method="POST" action="{{ route('register') }}">
    @csrf
    <div>
        <label for="name">Name</label>
        <input type="text" id="name" name="name" required>
    </div>
    <div>
        <label for="email">Email</label>
        <input type="email" id="email" name="email" required>
    </div>
    <button type="submit">Register</button>
</form>
To Customize:
- Add or remove input fields.
- Modify form layout using CSS.
Login Form:
File Location:
/resources/views/auth/login.blade.phpExample Code:
<form method="POST" action="{{ route('login') }}">
    @csrf
    <div>
        <label for="email">Email</label>
        <input type="email" id="email" name="email" required>
    </div>
    <div>
        <label for="password">Password</label>
        <input type="password" id="password" name="password" required>
    </div>
    <button type="submit">Login</button>
</form>
To Customize:
- Change input types or add placeholders.
- Modify the form layout with CSS.
2.7. Mail Template Customization
To modify the email templates sent by the system, update the email template files:
File Location:
servers(plesk, cpanel, etc) > portal directory > resources > views > emailAvailable Email Templates:
- welcome.blade.php - Sent when a user registers
- file-service-created.blade.php - Sent when a new file service is created
- file-service-completed.blade.php - Sent when a file service is completed
- order-confirmation.blade.php - Sent after a successful order
Example Code:
@component('mail::message')
# Welcome to {{ config('app.name') }}!

Thank you for registering with us. Your account has been created successfully.

@component('mail::button', ['url' => config('app.url')])
Login to Your Account
@endcomponent

If you have any questions, feel free to contact our support team.

Thanks,<br>
{{ config('app.name') }} Team
@endcomponent
To Customize:
- Edit the text content to match your brand voice and messaging.
- Modify the button text and styling as needed.
- Add additional sections or information relevant to your business.
- Use variables like
{{ config('app.name') }}to dynamically insert your application name. - Use
@componentdirectives to maintain the email layout structure.
Note: After making changes to email templates, test by triggering the relevant actions (registration, password reset, etc.) to ensure the emails are formatted correctly.
Customization Complete
You can now modify the header, footer, homepage, forms, and CSS files to match your platform's branding and design preferences.