Installation Guide
Tuning File Platform Installation Guide
This document provides step-by-step instructions for installing our ECU file management software after purchase. Follow the steps carefully to ensure a smooth setup process for your secure tuning file storage system. We have demonstrated the installation process using the Plesk panel. The same approach should be applied if you're using cPanel, DirectAdmin, or any equivalent platform.
1. Installation Steps
Step 1: Download and Extract Files
- After purchasing our platform, you will receive a .zip file from a Google Drive link or via email.
- Download the .zip file to your local system.
- Extract the files. After extraction, you will find two files:
- tuningdesk-data.zip – Platform data files
- database.sql – Database file
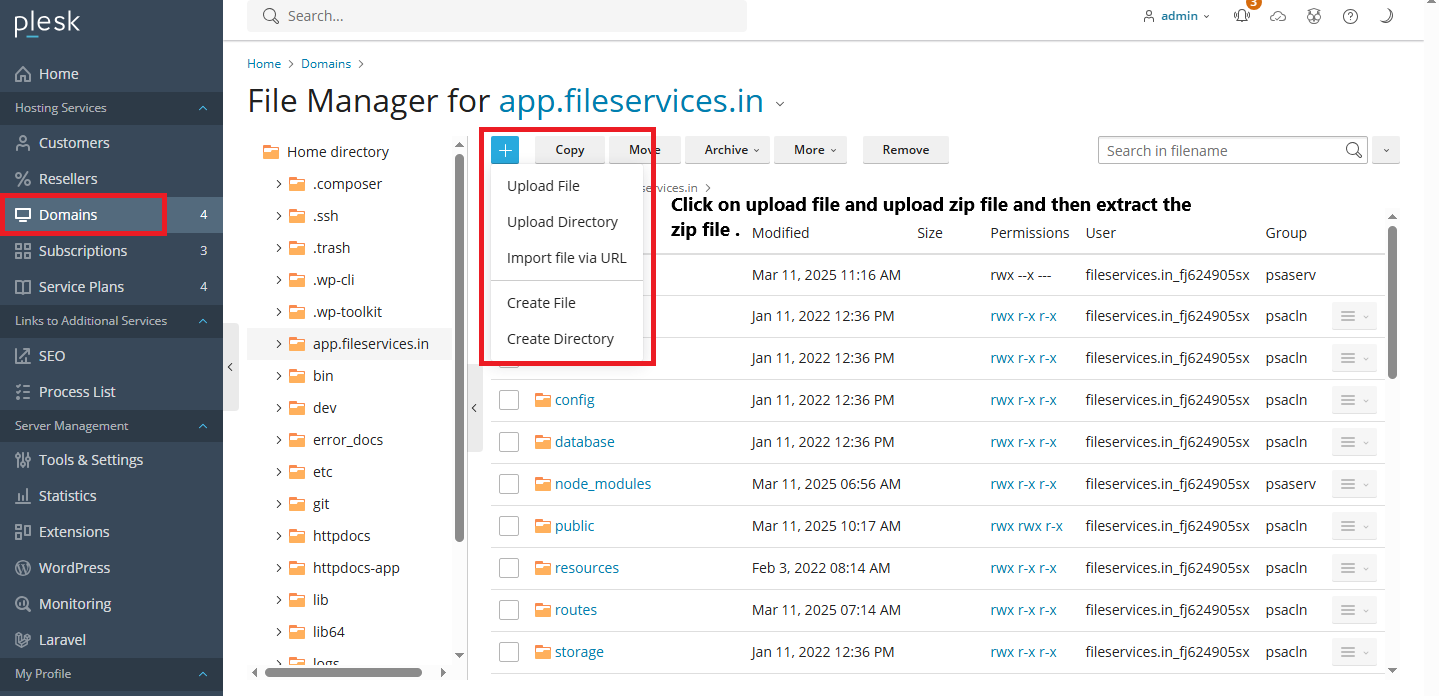
Step 2: Upload Files to Plesk
- Log in to your Plesk panel.
- Create a new Domain or Subdomain (e.g., app.yourdomain.com).
- In the Domain or Subdomain's file manager:
- Upload the tuningdesk-data.zip file.
- Extract the contents of the .zip file.
- Delete the .zip file after extraction.
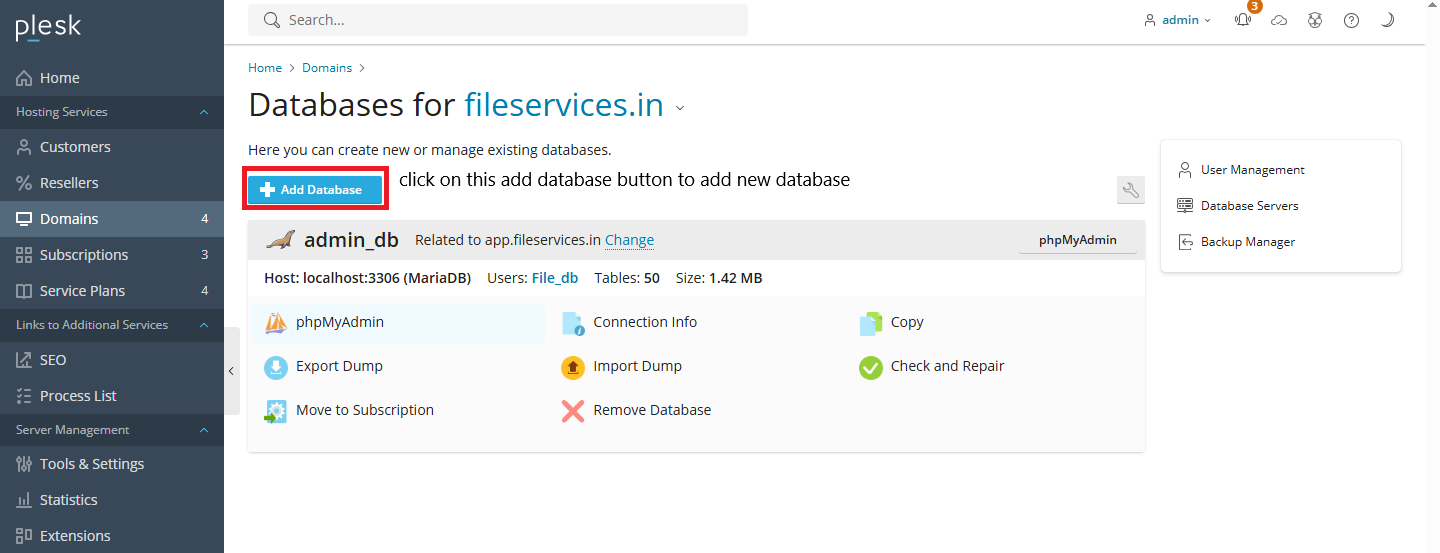
Step 3: Create a New Database
- Log in to your Plesk panel.
- Click on the Domains tab from the left-hand menu.
- Select your domain from the list.
- Navigate to the Database tab.
- Click on the Create Database button.
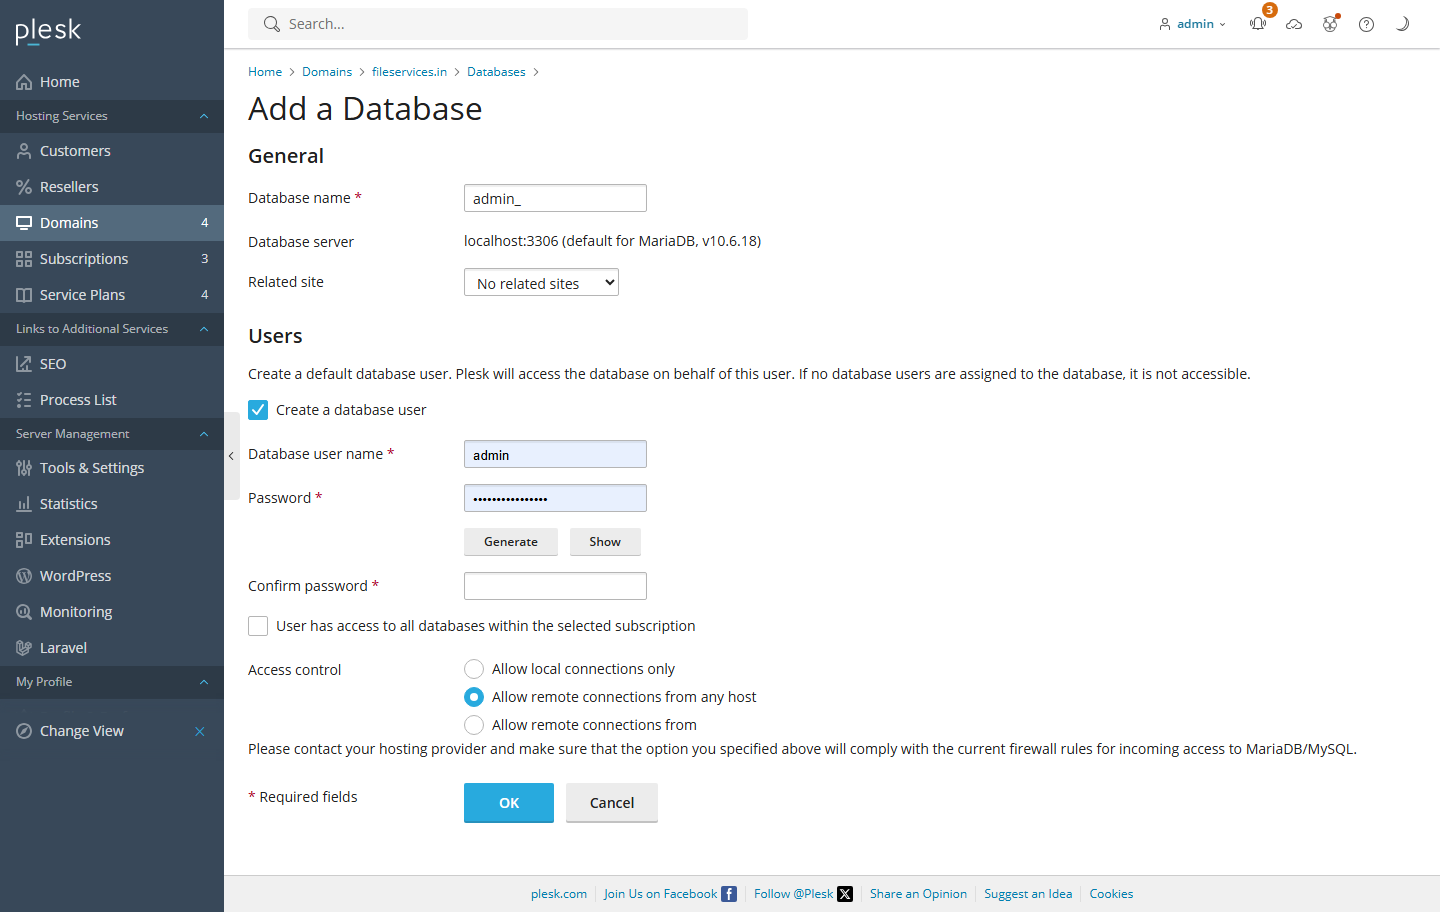
- A database creation window will open:
- Enter the Database Name.
- Create a Username and Password.
- Click Create to complete the process.
- Save the following details:
- Database name
- Username
- Password
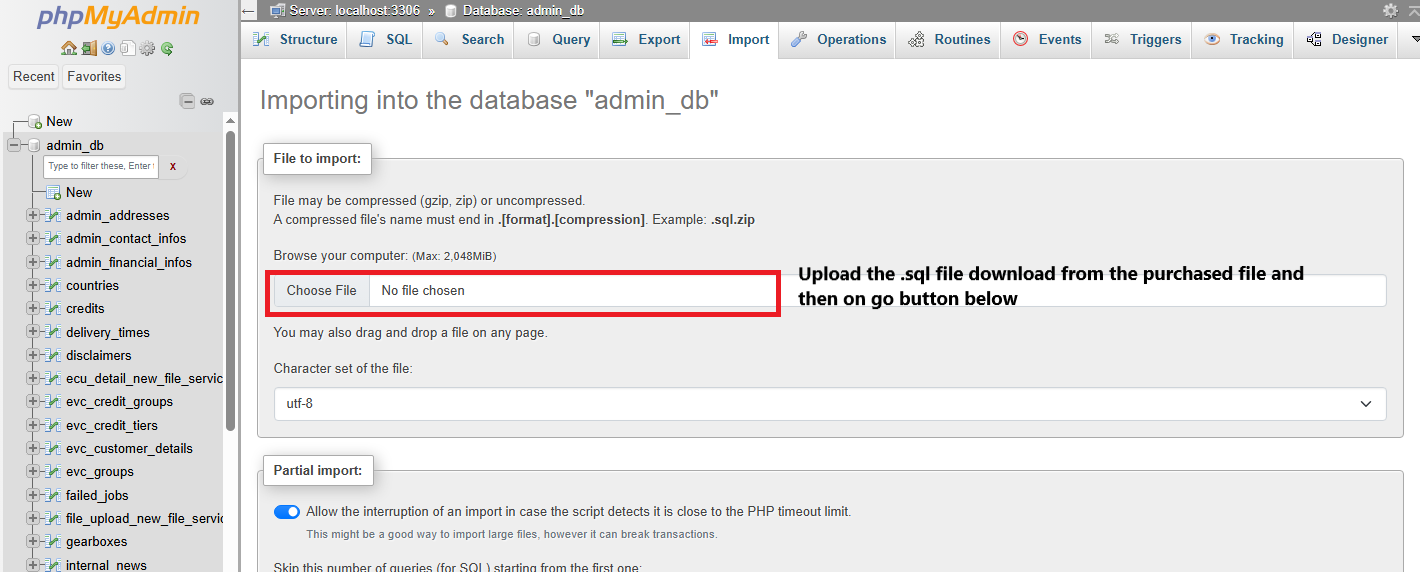
Step 4: Import Database
- Open phpMyAdmin from the Plesk control panel.
- Click on the Import tab.
- Select the database.sql file received with the platform files.
- Click Import to load the database.
Step 5: Update .env File
After extracting the files and creating the database, update the .env file with the following details:
File location: servers (Plesk, cPanel, etc.) > File Manager > your project/portal directory > .env file
1. App Name
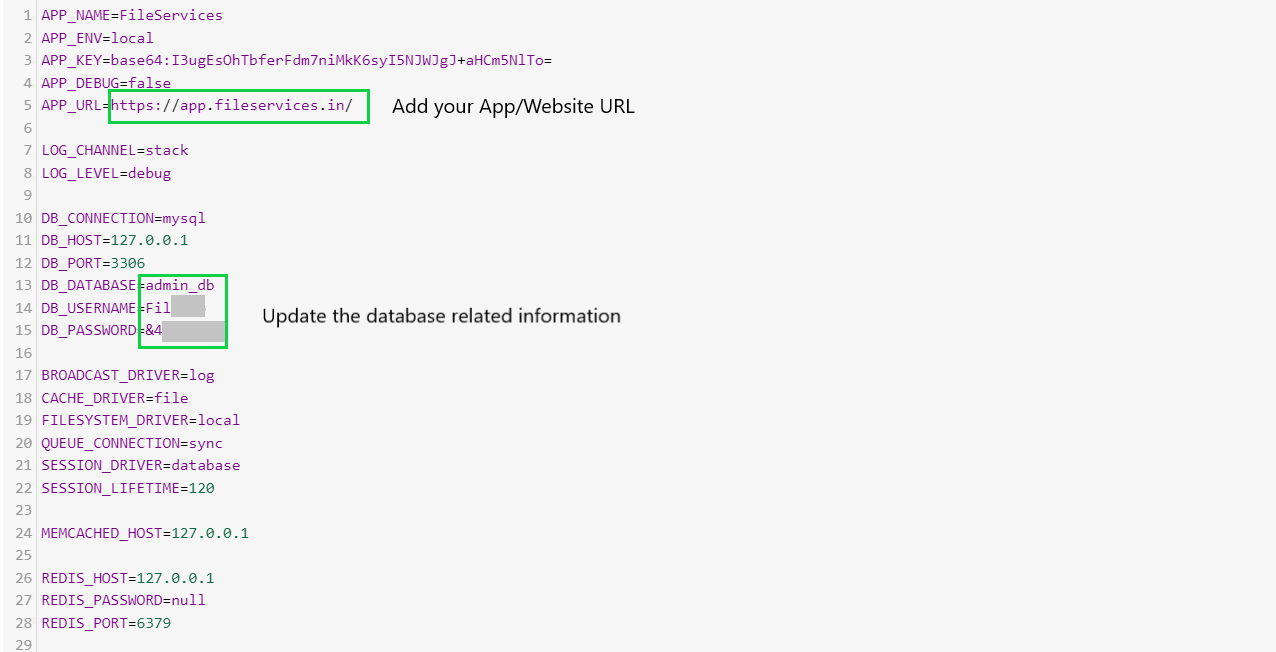
APP_NAME=TuningDeskReplace "TuningDesk" with your own portal name.
2. App URL
APP_URL=https://app.yourdomain.com3. Database Configuration
DB_DATABASE=your_database_nameDB_USERNAME=your_database_usernameDB_PASSWORD=your_database_password4. Mail Configuration (SendGrid)
MAIL_MAILER=smtpMAIL_HOST=smtp.sendgrid.netMAIL_PORT=587MAIL_USERNAME=apikeyMAIL_PASSWORD=your_sendgrid_api_keyMAIL_ENCRYPTION=tls5. PayPal Payment Configuration
PAYPAL_CLIENT_ID=your_paypal_client_idPAYPAL_SECRET=your_paypal_secret_key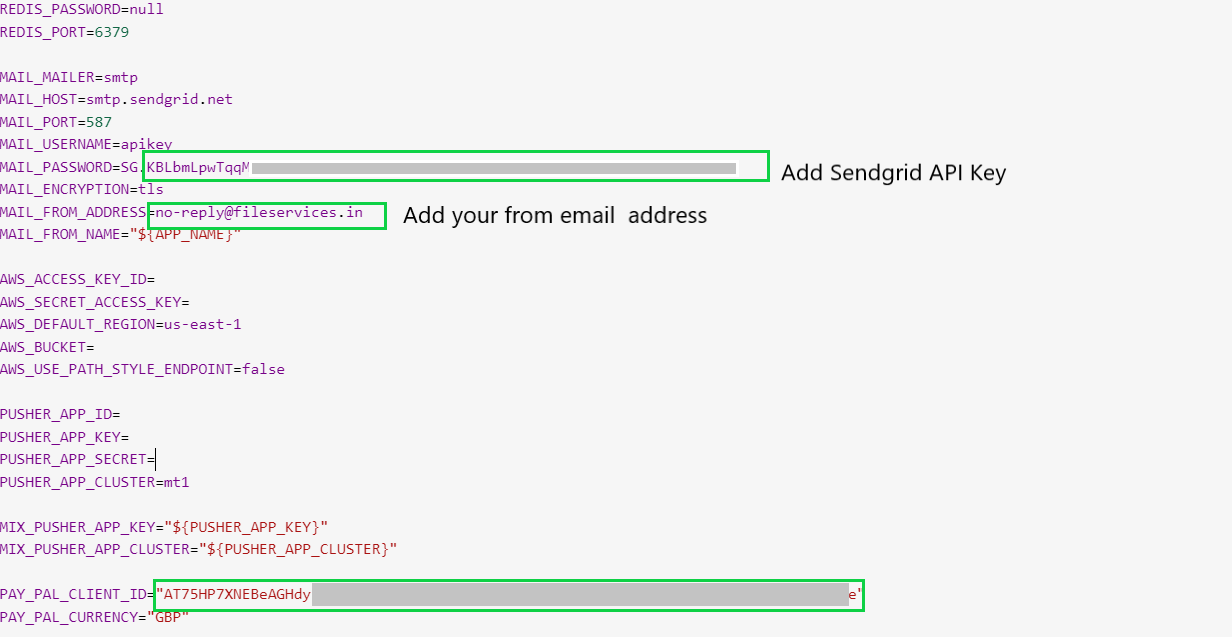
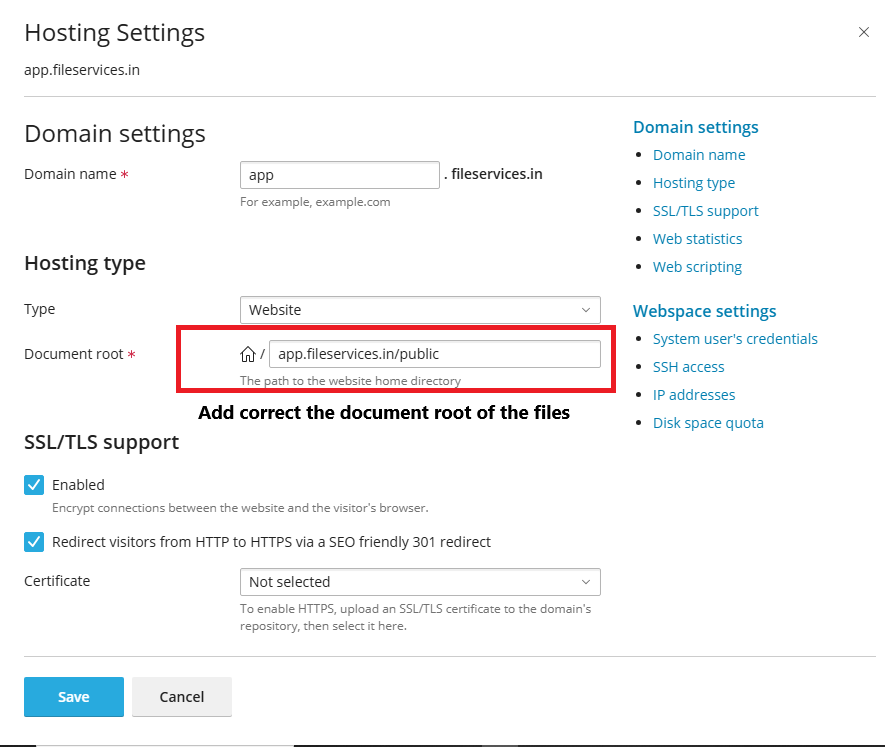
Step 6: Set the Correct Document Root
- In Plesk, go to the Domain or Subdomain settings.
- Set the Document Root to the /public folder of your project.
Example:
app.yourdomain.com/public - Update the DNS settings to reflect the correct document root.
2. Update Composer and Laravel Dependencies (If necessary)
If necessary, update Composer and Laravel dependencies as follows:
Step 1: Open Terminal in Plesk
- Open the terminal or SSH console in Plesk.
- Navigate to the project directory:
cd /path-to-your-project
Step 2: Update Composer
- Update Composer by running the following command:
composer self-update
Step 3: Update Laravel Dependencies
- To update Laravel and project dependencies, use:
composer update - If you encounter permission errors, use:
sudo composer update
3. Troubleshooting 500 Errors
If you've completed all setup steps correctly but still encounter 500 errors, try the following solutions:
Step 1: Verify Environment Configuration
- Open the
.envfile in the Laravel project root. - Confirm the following values are accurate and correctly match the server control panel MySQL database settings:
DB_DATABASE=your_database_name DB_USERNAME=your_database_user DB_PASSWORD="your_secure_password" - Enclose the password in double quotes if it contains special characters.
Step 2: Reset MySQL User Privileges via Server Control Panel
- Navigate to MySQL® Databases in your server control panel.
- Under Add User to Database, assign the database user to the database.
- On the privileges screen, select ALL PRIVILEGES and save changes.
Step 3: Recreate MySQL User (Optional Fallback)
- If the error persists, delete the current database user and create a new one.
- Assign the new user to the database with full privileges.
- Update the new credentials in the .env file accordingly.
Step 4: Clear Laravel Config Cache and Optimize Composer Autoload
Run the following commands to ensure Laravel uses the updated configuration and class mappings:
php artisan config:clear composer dump-autoload -oThese steps ensure proper database access for Laravel running in a server-hosted environment, for example plesk/cpanel or equivalent.
Installation Complete
Your tuning file management platform is now installed and configured successfully. You can now access your platform via the Domain or Subdomain URL and begin setting up your automotive tuning business software.